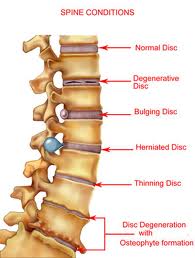
At the clinic, we see more clients with herniated disks than with any other back pain symptom.
Herniated Disk: A herniated disk occurs when all or part of a spinal disk is forced through a damaged part of the disk. This places strain on nearby nerves. Disk herniations occur mostly in middle-aged and older men, particularly those concerned in tiring physical activity.
Many of them bring X-rays that show that the disk – a rough pad of tissue that acts as a cushion between vertebrae- has been squeezed by the bones until it comes into contact with the nerve. The disk is either bulging like a balloon that is being squeezed, or it actually ruptures with its softer inner core material oozing out like a jelly doughnut leaking its filling. All these are the symptoms of herniated disk.
There are five exercises that are mitigating musculoskeletal pain in the low back.
• Sitting Knee Pillow Squeezes
Description
¨ Sit right on the edge of a bench with your feet flat on the floor, hip width apart, toes pointing straight ahead.
¨ Position a pillow between your knees
¨ Rotate your hips ahead to place a curve in your low back and hold this pose throughout the exercise.
¨ Squeeze and free the pillow with your knees
¨ Repeat as directed and do the squeezes slowly and evenly on both sides.
Purpose: This exercise strengthens the hip’s abductor/adductors to help pull the back of flexion.
• Static Back Knee Pillow Squeezes
Description
¨ Lie down on your back with your legs up over a block
¨ Position a pillow between your knees
¨ Set your arms out to the sides at 45 degrees from your body with palms up
¨ Loosen up your upper back
¨ Using your inner thigh squeeze the pillow and release evenly.
¨ Feet remain parallel to one another.
¨ Relax your stomach and do not contract your stomach muscles while squeezing
Purpose: This exercise stabilizes the pelvis bilaterally. It allies the adductor adductors with the force of gravity and disengages the lower extremities.
Description
¨ Lie on your stomach with your forehead on the floor.
¨ Your feet should be pigeon-toed and the buttocks relaxed.
¨ Rest your elbows on blocks so that the arms and hands are in the “Don’t shoot, sheriff- I give up” position.
¨ Make sure your shoulders are level from right to left. Breathe deeply, and relax the upper body.
¨ Do not press your arms into the blocks; let the chest and stomach fall into the floor, and that will cause the hips to tilt forward.
¨ Hold the position for six minutes.
Purpose: This exercise loosen the shoulders.
Description
¨ Start down on the floor on your hands and knees with your main joints aligned (i.e. shoulders should lie straight above elbows and wrists, hips directly above knees)
• Hands should be placed shoulder width apart, palms flat with fingers pointed straight ahead.
• Arms must remain straight, elbows locked
¨ Walk your hands about six inches forward and then move your upper body forward so that your shoulders are again above your hands but now your hips are forward of your knees about six inches
¨ Loosen up your low back allowing it to arch with the movement coming from the slope of your pelvis
¨ Collapse your shoulder blades together and fall your head down
• Your shoulders should be directly above your hands
• If your low back begins to hurt, back your hips up toward your knees; this will make the exercise a bit easier
¨ Do as directed.
Purpose: Generally, extreme flexion causes a herniated disk, and this E-cise promotes, as name implies, extension, relieving the pressure on the disk. This exercise allows the back to sway and restore the missing lumbar arch.
Description
¨ Stand with your back to the wall.
¨ Push your hips and minute of your back into the wall.
¨ Position your feet forward and at the same time sliding down into a sitting position.
¨ Stop when you reach a ninety-degree angle.
¨ Knees should be placed over the ankles.
¨ Push the low back and mid back beside the wall to feel the quadriceps working along the top of the thigh.
¨ Hold for one or two minutes.
Purpose: This exercise re-links the ankles, knees and hips.
Description
¨ Lie down on your back in the supine groin position with one leg straight out on the floor and the other leg on a block with the knee bent at 90 degrees
¨ Relax your upper body with your arms placed 45 degrees with body with your palms facing upwards.
¨ Flatten your leg and tighten your thigh.
¨ Notice which part of your body feel contraction or tightening of the muscle.
¨ Loosen up the thigh tightening for five minutes and recheck ones more at next five minute point. The contraction should be at the upper part of the leg this time and with each successive test
¨ Relax then repeat on other leg
Purpose: This exercise promotes an elongation of hip and groin muscles. The result of this action will generate a chain result of muscular response in the upper body
If the pain continues undiminished, do only Supine Groin Stretch and Air Bench; the lingering pain is telling us that we first remove the extra rotation from the hips. After about a week, try including the first five items, adding one or two at a time every couple of days. Back pain is a symptom of conditions that have been developing from years. It will take more than a few minutes to get results and some of the exercises, since they work on different muscles and functions, may take longer than others.
